Explore The Latest In Daysmart Salon!
The Daysmart Salon team continues to add new features and enhancements so our customers can streamline their operations, increase profits, and grow their business. So what’s new?
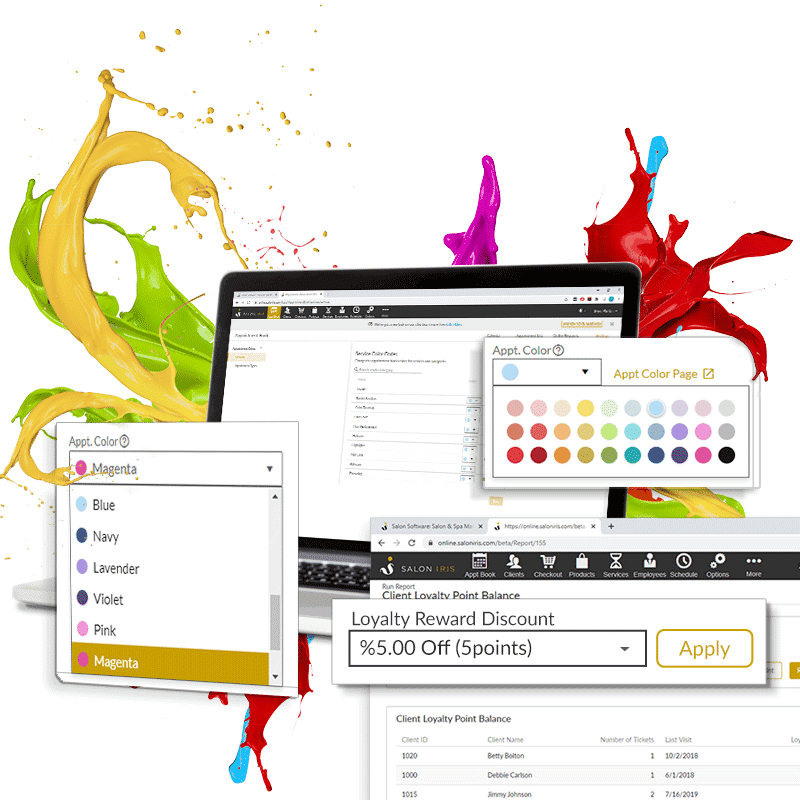
Enhanced Appointment Color Coding
(Available on Cloud Deluxe and Premier Package)
Our brand new color code system will allow you to select from 30 different colors to alter the appearance of specific appointment services and types. Customize your colors to suit your business schedule and create an organizational system that is optimized for you and your team.
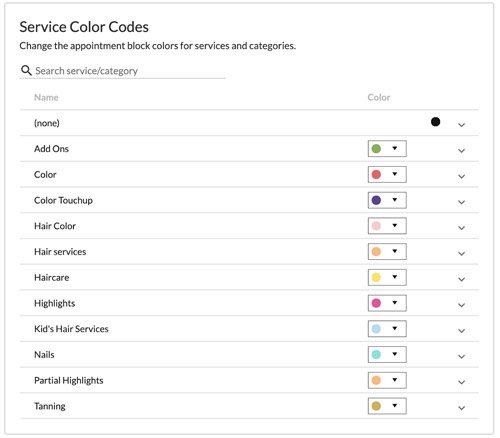
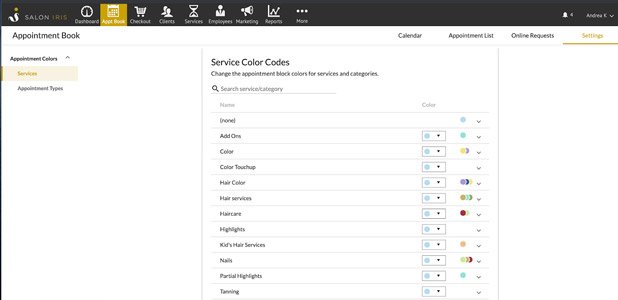
Service Colors
Set up each appointment service with a specific color or choose colors to group particular types of services together, so you can easily see at a glance which services are being performed for every appointment.
To set up your appointment service colors, click on the ‘Appointment Book’ menu, then click the ‘Settings’ tab on the far right. From here you will see an option on the far left for ‘Appointment Colors’, by clicking the drop-down you can then select ‘Services’ to populate your service categories. You can then click to expand each service category to see the services listed in that category and override the default service category colors. To make it even easier, you can also search for a specific piece of text, and the system will automatically expand and display services/categories that match.
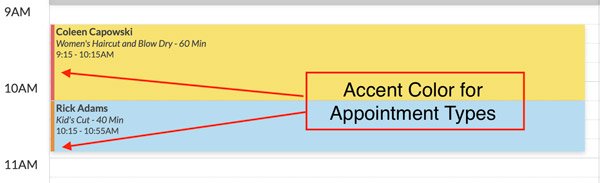
Appointment Type Colors
Add a secondary color to your calendar based on the appointment type! To set up colors for different appointment types (new booking requests, online bookings, transients, and walk-ins), select ‘Appointment Types’ underneath the ‘Services’ dropdown on the ‘Appointment Colors’ screen. You will then see each of your appointment types and you can select the color codes that suit your business from here.
Adding color codes to your appointment types will add an accent color to the color of the service on the appointment slot, so you can see at a glance the appointment service and the type of appointment without having to search through the appointment details.
Loyalty Points – Now Available on Cloud!
(Available on Cloud Deluxe and Premier Packages)
Loyalty programs are a great way to encourage recurring business and forge stronger relationships with your best clients. Showing clients they are important to you can make all the difference in retaining customers. In fact, 81% of clients say that a loyalty program encourages them to continue coming back to the same business. For that reason, we have recently upgraded Loyalty Points in our cloud products!
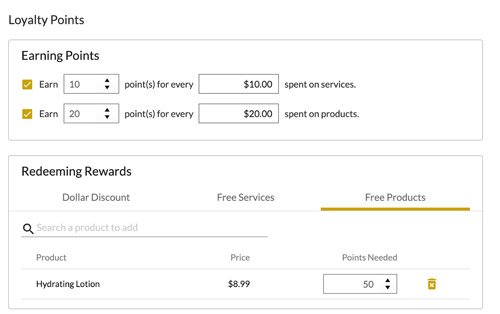
Customize Your Loyalty Rewards
A new sidebar for ‘Loyalty Points’ has been added to the ‘Options’ – ‘Management’ menu. From here, you can customize a loyalty point system that best suits your business, your employees, and your clients. Set up a point system for a specific dollar amount spent on services and/or products. Allow clients to easily redeem those reward points for dollar discounts, free services, or free products – the choice is yours!
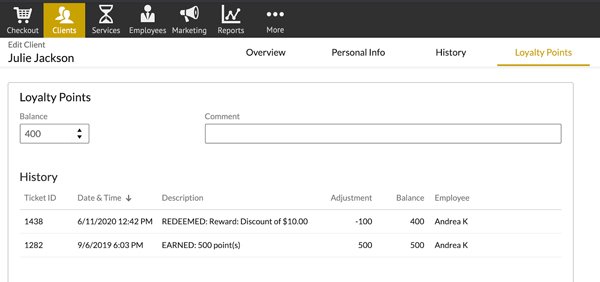
Loyalty Points on Client Records
To make running loyalty programs even easier, you can now view loyalty point balances when editing a client by clicking the ‘Overview’ tab. You can then modify those points and see the client’s loyalty points history from the same screen by clicking the ‘Loyalty Points’ tab.
Redeeming Loyalty Points
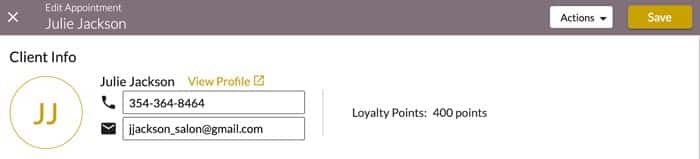
When viewing clients from the appointment book or the checkout screen you will now see their loyalty point balance. If the client has loyalty points to redeem, you will see a ‘Redeem Rewards’ button at the top of their record, and also in the ‘Add Items’ section.
When checking out a client you will now see a section to ‘Redeem Credits’ – you can apply the client’s available reward discounts from here, once redeemed the ticket will be marked as a loyalty reward.
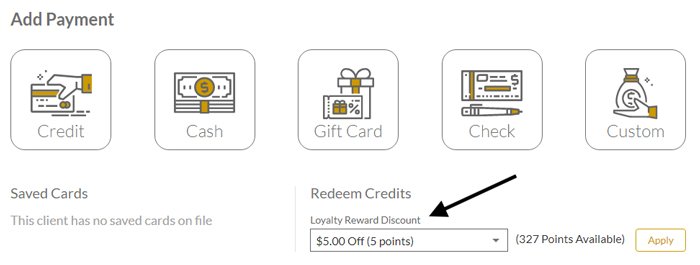
If a client wants to redeem their rewards, this will be shown on the ‘Order Summary’ section when closing the ticket. Once the ticket has been closed with the loyalty discounts, a new note will be added to the ‘Transaction Complete’ dialog, showing how many points that have been used and their remaining balance. You can also email or print this receipt for the customer.
![]()
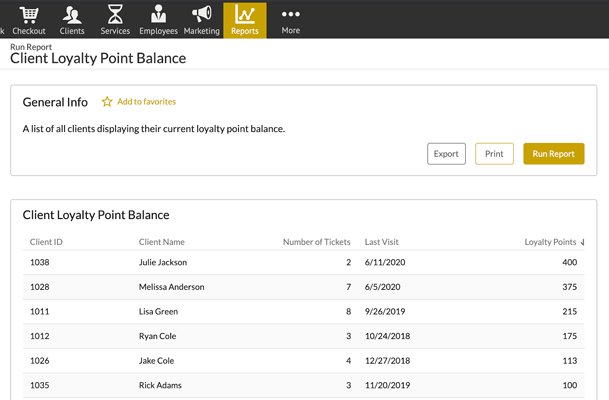
Loyalty Point Reports
So you have your loyalty rewards system set up and ready to go – great! But how are you going to keep track of everything? We have added a new report for ‘Client Loyalty Point Balance’ so you can easily see a summary of each client, with their name, number of tickets, last visit date, and loyalty point balance. You can also now view Loyalty Points on the Sales Totals and Sales Tax Report, this will give you greater insight into your programs so you can modify them to maximize revenue opportunities.
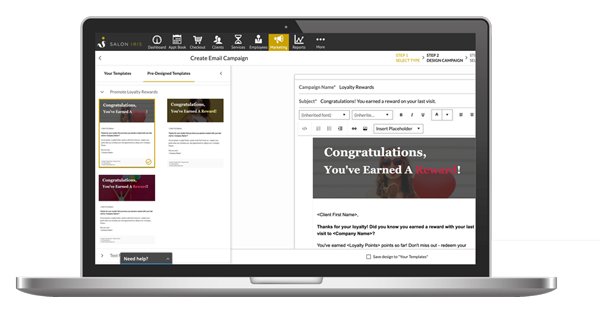
Promote Your New Loyalty Program
We have added a new campaign type for ‘Promote Loyalty Rewards’, available for both email and text campaigns, to help boost your new loyalty program and make it a success!
To create your new email loyalty campaign, click the ‘Marketing’ menu, next click the ‘Promote Loyalty Rewards’ recurring campaign type. This campaign is intended to help you automatically remind clients when they have loyalty points to redeem in order to encourage them to book another appointment.
The campaign has merged fields, body text, and header images ready to go – all you have to do is choose from one of our professionally made template designs and set up your client reward criteria. For example, “Client has earned at least 100 loyalty points that have not been used”. Your campaign is now set to run whenever the client criteria is met – it really is that simple!
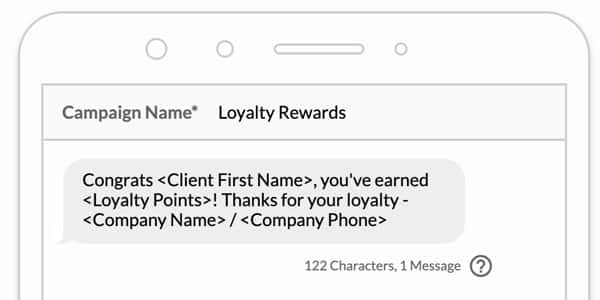
While email is a great way to let clients know they have loyalty points to redeem – text marketing is becoming increasingly popular among businesses, as it provides a greater sense of urgency.
Send your clients a text to let them know they have points to redeem with a few simple clicks – select the ‘Marketing’ menu and then click ‘Text Marketing’. Select the recurring ‘Promote Loyalty Rewards’ campaign and from here you can choose from three different templates to let clients know when they have earned rewards or that they have rewards available to redeem. Finally, you just have to select your client rewards criteria and activate your campaign – Daysmart Salon will take it from there!
(If you do not have Text Marketing turned on in your Daysmart Salon account and you’re interested in utilizing text campaigns, please contact our team at (800) 527-7600 or email us at [email protected] and we will be more than happy to help you get set up.)
New Marketing Campaigns and Filters
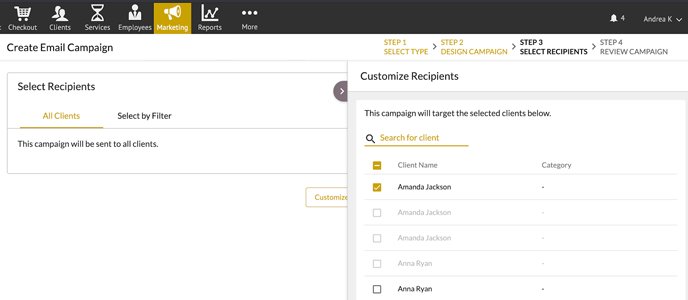
One-Time Campaign Customizable Filters
When creating a one-time email or text campaign, you can now customize the filtered list of clients. Once you get to the ‘Select Recipients’ screen you will now see a ‘Customize Recipients’ button, this button will open a side panel that will show you a list of all active clients that are able to receive this campaign. You can then select/deselect the specific clients you want to target with your new campaign.
New Text/Email Templates
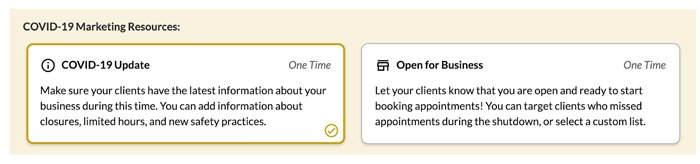
We have added new pre-made text and email marketing templates to help you automate your COVID communications, let clients know about your reopening protocols, or promote your new Tele-Consultation service! To explore these new campaigns, click the ‘Marketing’ menu, and select your campaign type, you will now see a variety of templates to choose from!
New Client Marketing Filters
We have added additional client filters so you can sort clients by last appointment date in order to intelligently prioritize re-booking by last appointment, or group clients by cancellation date to help phase in your re-opening.
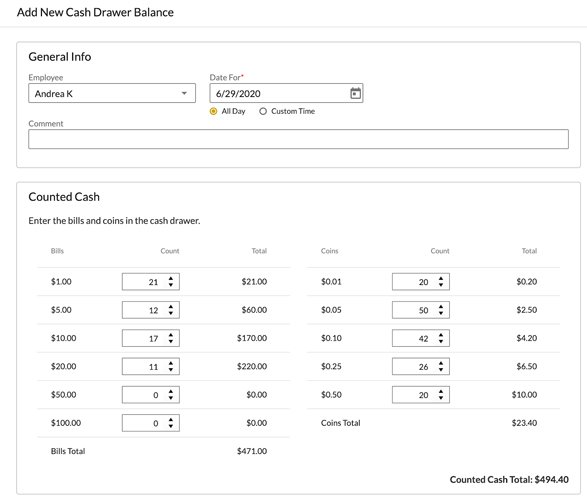
Cash Drawer Reports are Here
(Available on Cloud Deluxe and Premier packages for US-based businesses only)
We have added a new menu called ‘Drawer’, if you click this menu item you’ll be taken to a screen to see a list of all Cash Drawer Balance reports, which can be customized by time range or by a specific employee. Any cash drawer report that comes up short will display in red – helping you proactively spot mistakes before they become real issues.
To add a new cash drawer balance, click the large ‘+’ button located in the right corner and set up your cash drawer preferences from here.
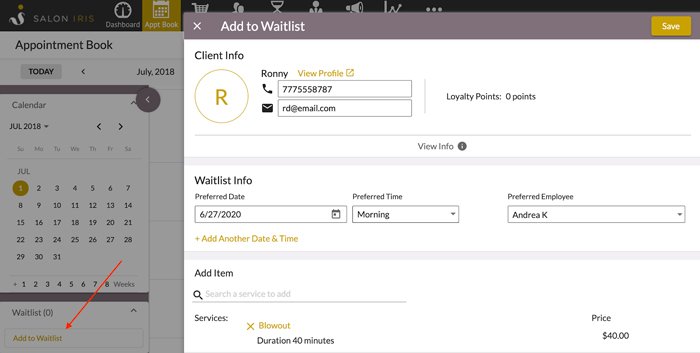
Add Clients To Your Waitlist
(Available on Cloud Deluxe and Premier Packages)
Waitlist functionality has been added as a collapsible side panel on the appointment book. You can add new clients or select from existing clients and add them to your waitlist from the ‘Add to Waitlist’ button. Next, you can choose the preferred date/time and preferred employee or simply pick first available and add up to five services!
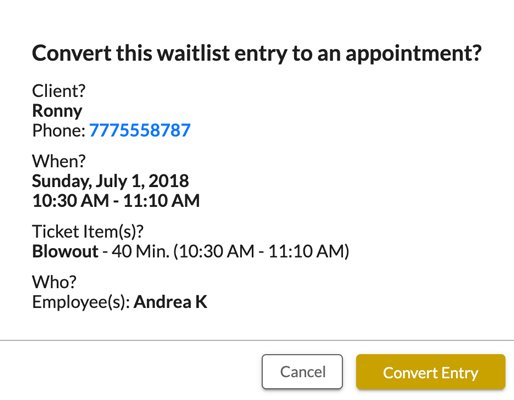
There are two different ways to convert your waitlist to an appointment. The first option is to simply edit the waitlist entry and click the “Create Appointment” button. The client, date, services, and the selected employee will be auto-filled based on the waitlist. The other option is to hover over your waitlist item and drag and drop it into your open appointment slot.
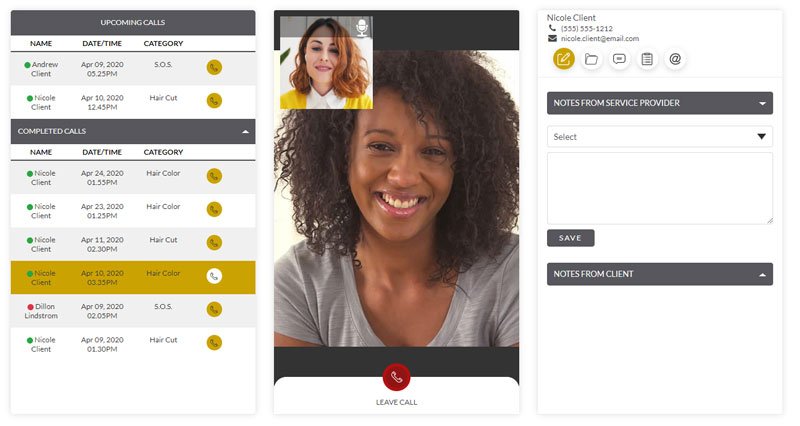
Consult With Clients Via Video Chat
We have incorporated a free video consulting feature, Tele-Consultations and we hope that you’ll use it to conduct client video check-ins, re-booking discussions, or paid 1:1 consultations for clients reluctant to return to the salon.
To use this new service, click the ‘Consults’ menu, and activate your free service. From here you can then set up your availability by clicking the ‘Availability’ tab, add the services you are offering by clicking the ‘Settings’ tab, and then selecting ‘Add New’. The final step is to generate your tele-consult booking link so customers can reach you via your unique link. To generate your new link click ‘Settings’ – ‘Tele-Consult Link’ which will automatically copy the link to your clipboard.
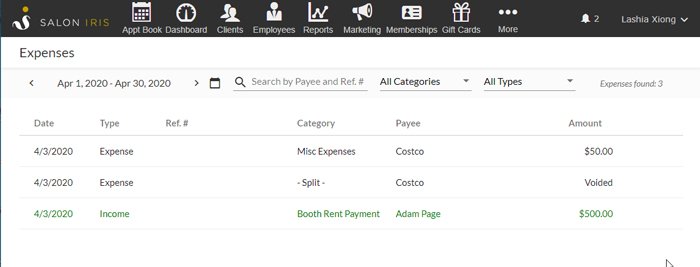
Track Expenses Effortlessly
(Available on Cloud Premier Package)
To explore our new Expenses feature, click the ‘More’ menu, then click ‘Expenses’. This will take you to a list view of your expenses showing dates added, type of expense, reference number, category, and amount. You can filter to view particular date ranges, delete, edit, and add expenses from that same screen.
If you no longer want an expense to be calculated in any reports, simply edit the expense and click ‘Void’, there is also an option to ‘Delete’ the expense. Deleting the expense will completely delete it from the database and it will no longer be viewable.
We hope you enjoy these new Daysmart Salon features, and we promise to continue to enhance the systems you use to run and grow your business so that you can spend more of your time serving your clients. As always, if you have any questions, please don’t hesitate to contact the Daysmart Salon success team at [email protected].

 DaySmart